Vim, Screen, and The Awesomest IDE Ever
When I’m writing code, I am always using two classic tools, common on many UNIX-based systems: Vim, and GNU Screen. I’ll show you how I use them, as I don’t think any two programmers use them the same way. Some programmers may prefer to use a big, fancy ‘IDE’. There is no need. Vim and Screen can combine to be The Awesomest IDE Ever
Note: My day job primarily consists of writing Ruby for Ruby on Rails applications, so the following outline is focused on that type of environment. What am I saying? Most of the programming I do outside of work involves Ruby or Rails, too.
GNU Screen
I’ll start with GNU Screen, as it’s the lesser-known of the two subjects of this post. (I’ll call it simply ‘screen’ from here on – but if you’re Googling, you’ll want to include ‘GNU’.) Screen is often described as a ‘terminal multiplexor’. GNU likes to call it a full-screen window manager. A clearer description would be “screen takes the concept of tab support in a terminal, and pumps it full of steroids”. At its core, screen allows you to create multiple terminal windows within a single terminal – like, say, Gnome terminal’s tabs. It does so much more than that, though. From GNU:
… at any time, you can create new (full-screen) windows with other programs in them (including more shells), kill the current window, view a list of the active windows, turn output logging on and off, copy text between windows, view the scrollback history, switch between windows, etc. All windows run their programs completely independent of each other. Programs continue to run when their window is currently not visible and even when the whole screen session is detached from the users terminal.
The latter feature, detaching from the terminal, is perhaps the most -important- awesome feature. A number of people use screen for that feature alone. For instance, I often SSH into my home desktop machine and re-attach to a screen session that has a window for IRC, a window with an open SSH session for each of the servers I administer, and a window open for miscellaneous commands I may want or need to run on my home machine. I can detach from this set of terminal ‘windows’ or ‘tabs’ at any time, and reattach at any time. It’s fantastic if you like to never miss a word of your local Ruby group’s IRC chatter. That’s a completely practical application of that feature. Right?
These aren’t all of the features of screen, but I’m long-winded without getting worked up about discussing every feature of GNU screen. You can clearly see how screen provides the infrastructure for The Awesomest IDE Ever. Let’s just move on.
Vim
Vi IMproved . It’s often called a programmer’s editor, although I use it for anything and everything, when I can get away with it. (I used it to write this rambling, incoherant post. The rambling and the incoherance have nothing to do with Vim, I swear.) Vim uses different modes (e.g. ‘Insert’ mode, ‘Visual’ mode, ‘Normal’ mode) as a powerful and efficient way to traverse and edit text files. It’s highly configurable and extendable. It’s great. If you’ve never used it, and you think it’s going to be impossible to learn, it’s not! If you have Vim installed, and you want to give it a shot, just type ‘vimtutor’ at a command prompt, and follow the tutorial.
Vim + Screen
By combining Vim + Screen, you can get your own IDE that doesn’t completely suck. Resources. Suck resources. I’m not saying that any other ‘IDE’ things that I have ever used are each a horribly twisted orgy of unnecessary features and mouse-slam-inducing bugs, possessing the customization possibilities of a straight-jacket. They aren’t basically a large pile of naked, over-weight, pasty, inept middle-aged men, necessarily. No, I’m just saying that the filthy bastards hog a lot of resources. Vim, Screen, and the few other processes I run along side them, when working on a Rails app, do not.
Let’s look at a pretty picture:

The two most interesting features are the split screen, and the pretty little window list at the bottom of my terminal window. Both features are made possible by screen. Let’s focus on the window list first:
Screen Details
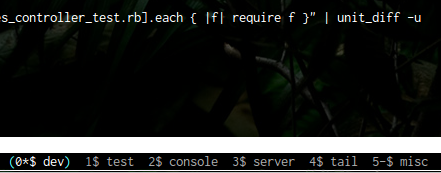
Sweet. We’ve got a nice little list of windows, one for each thing I want out of my development environment, but in a fairly simple, unobtrusive format: ‘dev’, my primary development window, ‘test’, where my tests get run (in this case, using ‘autotest’, they are run any time I save a file), ‘console’, for my Ruby REPL (script/console from Rails), ‘server’ for the app server, ‘tail’ for printing whatever log I feel like following, and ‘misc’ for one-off commands and the like. I can cycle through the windows by typing Ctrl+a, then ‘n’ for next, or ‘p’ for previous, or the number of the window. In just a few pixels of space, I know where everything is, and I don’t have to grab my mouse to get there. Suck it, Mammoth IDE Software.
Note: The window list at the bottom doesn’t come for free. You’re welcome to use my configuration file for screen, ‘screenrc’. This file is exactly the screenrc used in this article’s screenshots.
As you can see, screen also allows you to split your terminal window so that you can view two (or three, or four – go crazy!) screen windows at the same time. For me, this is killer. I am able to code in Vim while watching my test output in the smaller pane on the bottom. No pop-up messages to distract you. No sound effects. (Hmm. Perhaps I’m too easily distracted. And too easily annoyed.) It’s also trivial to focus on the bottom window (Ctrl+a, then j or tab), at which point I can scroll the output, or I can switch to, say, the console window to try some stuff out there before I throw it in the actual code. Screen can also split vertically, if you dig that. With a widescreen monitor, why wouldn’t you? I prefer to use Vim’s vertical split screen ability (in my top pane) to edit, for example, a class and its tests at the same time. However, It does seem like I’m wasting a lot of space in that bottom pane. Let’s try a vertical split down there:
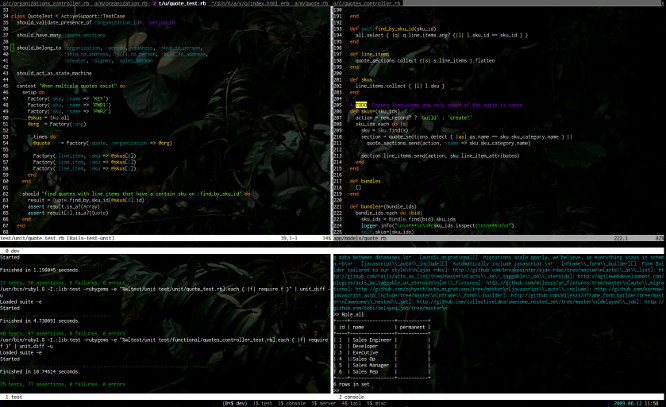
Sweet! I’m glad you talked me into trying that. That’s Vim split vertically on top, and screen split vertically on the bottom (tests on the left, REPL on the right).
Vim Details
You can find fantastic information about Vim all over the place. I don’t want to bury you under finger-gymnast technique for both screen and vim, if I can help it.
A good place to start look for information is Vim.org, of course. I maintain a page of what I believe to be useful vim links on my GitHub Page page (Ed. note – no longer on my Github page, but right here). If you’re jonesin’ for small tidbits of vim awesomeness once per day, check out my @vimtips account on Twitter . Okay. On to live action…
If you’re ever programming within the Rails framework, then you should be using rails.vim . It is the most essential plugin in my vim plugin arsenal. It has a ton of features. Incredibly helpful shortcuts to opening project files, integration with vim’s tabs, as well as vim split screens (more on that in a sec), enhanced syntax highlighting, shortcuts for the various script/ scripts… I could go on, but I won’t. (Type the command :help rails to browse the extensive help pages.)
As for splitting, and the way I typically use splits in vim: You may already know that you can type the command :vsplit to get a vertical split in Vim. With rails.vim, you can simply type :AV from a model or controller, and its corresponding test file will open up on the left-hand side of a vertical split. The ‘A’ in the command stands for ‘alternate’, and the ‘V’ stands for vertical split, of course. You can open other files into a vertical split using several of the other rails.vim commands. For instance, :Rcontroller would become :RVcontroller, at which point whatever file you currently have open would move to the right, and the related controller file would open on the left.
The vim way is the way I want to edit text. Always. It’s incredibly efficient. Thus, it is the perfect text editor for The Awesomest IDE Ever.
This is my “IDE”
After some initial configuration, what you see above can be up and running in just a few seconds. In fact, all I do is type Meta-t (the windows button, or command when I’m using the incomparable Apple keyboard) to open a terminal, cd devel/project-name, and then enter the command scrails. Really, scrails is just an alias for screen -c ~/.rails.screen. (It sounds cool, though. Right?) That rails.screen file looks like this:
#
# Initiate a screen session with my
# preferred dev environment
#

source /home/mileszs/.screenrc

screen -t dev 0
split
resize 40
focus down
screen -t test 1 autotest -f
split -v
focus down
screen -t console 2 script/console
focus top
screen -t server 3 script/server thin
screen -t tail 4 tail -f log/development.log
screen -t misc 5
select 0
I’ll explain:
First, sort of a ‘step 0’, read in our screenrc file. Simple enough.
- Create a new window, give it the title (See?
-tfor title!) ‘dev’, and let it be window number 0. - Create a horizontal split
- Resize the upper window
- Focus down to the split we created in step 2
- Create a window with a title of ‘test’, and run the command
autotest -f - …
You get the idea. The command split -v creates our vertical split, which screen thinks of as ‘down’ in the list of splits. At the end, we select window 0 as the window in which we want our cursor when this has finished.
Easy. Right?
I don’t know if this ultimately came across as easy. It really is. I encourage you to install GNU screen and install Vim. Give them a shot. Use all of my config files to start, and then beat those files to hell to see what you end up with. Vim is great; a great deal of programmers already know that. With screen, you can take the greatness of vim and create The Awesomest IDE Ever. Good luck!
Note: My workflows and tools have changed several times since this post. Recently (November 2012ish) I returned home, in a way: I use terminal vim, and tmux, which is essentially a better GNU Screen. It’ll get a post soon, I’m sure.